7.1 Proximal End of Cables
7.1.1
Insert a 0.0195” Teflon coated stainless steel mandrel through the proximal end of the central lumen of the catheter for approximately 5cm length. Allow approximately 5 cm length exposed for later extraction in subsequent steps.
7.1.2
Strip the outer jacket of each colored coaxial cable approximately 4mm using a blade breaker.
7.1.3
Separate the outer conductors from the dielectric insulator by pulling the insulator off the main line of the coaxial cable. Hold all the outer conductors with a tweezer and twist the conductors tightly together by rotating the outer jacket with the opposite hand.
7.1.4
Strip the dielectric insulator using a blade breaker (or equivalent stripping tool) as illustrated in Figure 1, leaving approximately 1mm of dielectric insulation on the prepped wire.
7.1.5
Apply a thin layer of solder paste to the outer and center conductors using a spatula. Tin the outer and center conductors using a soldering system set to 350°C.
7.1.6
Cut the outer and center conductors to final length per Figure 1.
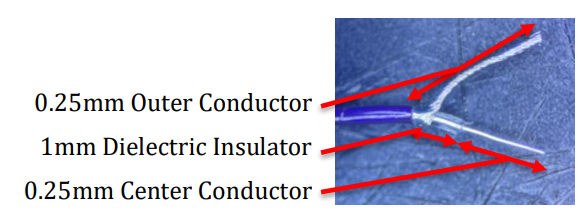 Figure 1: Example of micro-coaxial cable.
7.1.7
Place the bridgeboard circuit from the Cable Subassembly in the circuit board holder.
7.1.8
Fix the inner lumen with pre-loaded mandrel and spine wire to the magnet to prevent heat damage from the soldering tip.
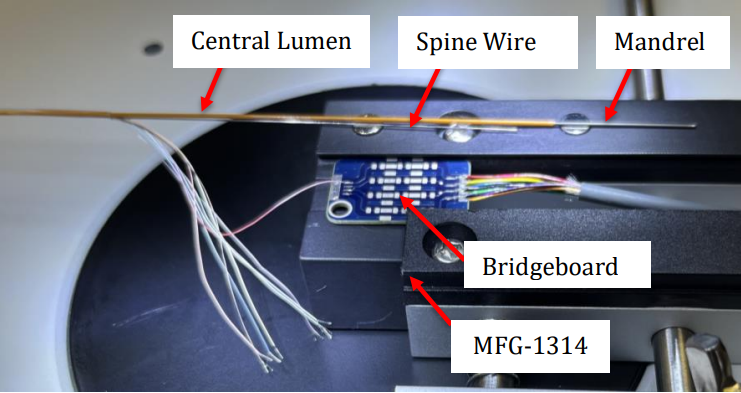 Figure 2: Placement of catheter subassembly and catheter cable onto circuit board holder.
7.1.9
Pre-wet the circuit ground and signal for catheter joints using solder and a Soldering Station on both the front and back sides of the bridgeboard circuit.
7.1.10
Using tweezers, hold the outer conductor wires against the pre-wetted circuit ground. Solder the conductor wires to the circuit using a soldering station set to 350°C. Cut the excess conductor wires from the Bridgeboard circuit using a blade breaker as necessary. As the following steps are performed, ensure that colors are electrically connected to the bridgeboard per specification.
7.1.11
Using tweezers, hold the insulator jacket adjacent to the pre-wetted circuit signal pad. The exposed center conductor wires should be between 25% to 75% of the full length of the pre-wetted circuit signal pad. Solder the conductor wires to the circuit using a soldering station set to 350°C. Cut the excess conductor wires from the Bridgeboard circuit using a blade breaker as necessary.
7.1.12
Clean the circuit from excess solder as necessary using an antistatic swab and 70% alcohol.
7.1.13
Repeat steps 7.1.11 thru 7.1.12 for the back face of the bridgeboard circuit.
7.1.14
In-process inspection: Perform a visual inspection of the soldered conductors.
- Verify: Color order of coaxial cables is positioned as specified in the drawing.
- Pass: Both outer conductor and center conductor are tinned to their pads (ground and signal, respectively).
- Pass: Center conductor is on 25-75% length of signal pad and does not exceed boundaries of the pad.
- Pass: Dielectric insulator is adjacent (up to) or past the signal pad.
- Pass: Dielectric insulator is not melted or otherwise deformed by heat.
 Log In